Chrome Extensions Going Rogue

Google Chrome is a great browser, and it became my primary browser as soon as it introduced support for extensions. I’d previously been using Firefox, which had a tendency to crash and lose my open tabs at annoyingly regular intervals (it’s fair to say that I’ve always had a problem with having way too many tabs open at the same time, which didn’t help, and typically have to declare tab bankruptcy every six months or so).  I would have moved to Chrome sooner, but for me, browser extension support was a vital requirement so I could streamline my web browsing experience.

Unfortunately, extensions pose serious security and privacy risks, and my recent experiences have led to me having serious concerns about whether I should continue to use them.  I’ve now had two extensions go rogue on me in the last year, after updating themselves automatically and adding unwanted “features” in the process.  In addition, my girlfriend had one which started creating links in web page text and showing ads on mouse over (which was really hard to get rid of).  Here’s a rundown of the two extensions I personally had go rogue on me, and my tips for tracking them down.

Window Resizer

The first extension I had a problem with was Window Resizer, a really handy extension that resizes your browser to match different screen sizes, such as that of tablets and phones.  It’s a great tool for web developers who are developing responsive websites, like I do.  Unfortunately, after a while, the developer decided to cash in by having all Google search results be redirected through EcoSia, effectively tracking a huge proportion of my web activity without my permission.  I noticed this problem as my browser started randomly failing to successfully navigate to sites, getting stuck on the EcoSia redirect, and was able to track the problem down eventually to the Window Resizer extension thanks to other posts on the web about it.

I never agreed to this behaviour when I installed Window Resizer, and it didn’t do this when I first installed it.  Unfortunately, extension developers can introduce these “features” into new versions, which get automatically installed thanks to the fact that like Chrome itself, Chrome extensions automatically update silently as new versions are released.  This is a big problem, as extensions can build up a big user base from providing a useful and expected service, and then suddenly go rogue without warning (occasionally being bought by malware operators).  And it can be really hard to track down the culprit – that’s if you even realise that there’s even a problem.

In the case of the Window Resizer extension, the developer decided to make money out of his extension by having the extension send all clicks on Google results via EcoSia.  He did make this behaviour optional (it could be turned off), but turned it on by default.  With this update being pushed out to all users automatically, suddenly the browsing activity of all users was getting tracked without their express permission, with most not even realising it.  Ultimately, the developer of Window Resizer faced a huge backlash, and after attempting to defend his decision by blaming the users for not reading the release notes, he ultimately apologised and backed down under a barrage of criticism.

Quick Note

Just last night I found another Chrome extension had gone rogue.  I was using Fiddler (a web debugging tool that logs all web requests/responses) to analyse an OAuth2 negotiation workflow.  However, I started to notice all these requests to a domain named webovernet.com each time I navigated to a URL, which started to concern me.  After Googling the domain and discovering it was a click tracking domain I realised another browser extension must have gone rogue, and went into investigative mode to track down the culprit.

Fiddler

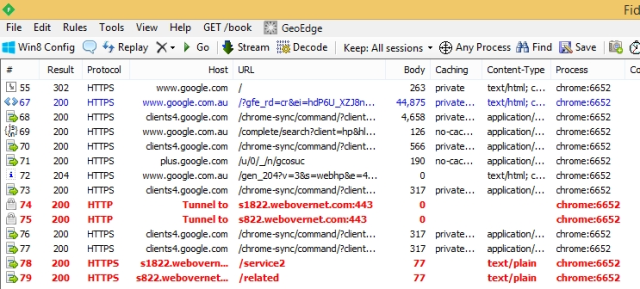
The unexpected calls being to webovernet, which I’ve highlighted in red.

Note in the image above that the requests are sent via HTTPS calls, which make them even harder to detect.  They only show in Fiddler if you are capturing HTTPS content (i.e. the Capture HTTPS CONNECTs and Decrypt HTTPS traffic options are enabled for Fiddler, which are turned off by default). So you wouldn’t even see these calls in regular use of the tool, making this behaviour hidden to even tech savvy users.

The process of tracking down the culprit was quite simple. I opened up the Google search page to use as my test.  Any page would do, but I chose this as it makes minimal additional server requests so it wouldn’t clog up the Fiddler logs.  Open Fiddler, make sure capturing HTTPS traffic is on, and start capturing your web traffic.  Each time I refreshed this page, corresponding requests would be sent to the webovernet domain, so I had a clear failing test case (for those of you into test driven development).  The task now was to disable various extensions and refresh the Google search page until I didn’t see any more requests to the webovernet domain. Disable an extension, refresh the page, check the traffic, and repeat.

Ultimately, I discovered it was an extension called Quick Note that was the offender.  This was an extension I must have installed a long time ago but never really used.  Looking at its details in the Chrome store, you can see that the developer updated their privacy policy to allow it to capture all my browsing history.  Of course, I was never made aware of this.  Bastards.

Blog3

The big lesson from this is to disable or uninstall all extensions that you don’t use!

The Big Issue

The big issue I have with extensions is that developers can introduce this malware/adware/spyware without users being aware of it, and potentially never actually realising it.  It’s only because I spend a fair bit of time in the Chrome Debugging Tools and Fiddler that I notice these sorts of issues.  I’m in a position to be able to detect these problems, but these are just skills that the average punter doesn’t have.

We live a lot of our online lives in a web browser these days, including a lot of private activity such as shopping, banking, and so on.  Depending on the permissions you’ve granted them, browser extensions can have access to all of this.  We are making a lot of private information available to unknown entities, and putting them in a position of trust to not take advantage of it, which is ultimately being abused in the name of money.

To help solve problems like this, Google prevented Chrome extensions from being installed outside of the Chrome Web Store, in May this year.  Unfortunately, this doesn’t really do much, as you can see from my issue with the Quick Note extension.

You can’t trust extensions after doing an audit, because they auto update.  Just because you verified the behaviour of all your extensions and haven’t installed any new extensions recently doesn’t mean that you’re OK, as any one of those installed extensions may auto update and go rogue.

The other big issue is the amount of access that extensions have to your browsing activity.  Unfortunately, most of the useful extensions need a very wide permission base, with almost all the extensions I have installed requiring access to my data on all websites, and access to my tabs and browsing activity.  This is particularly concerning, and while I’m not an expert in this since I haven’t written an extension myself, it seems much of it is because Chrome’s permission levels are quite coarse.  The Window Resizer extension developer wrote this about the permission levels it requires just to resize the browser window:

This extension doesn’t *need* access to your browsing history or data on any site, but it *needs* access to the tabs and window in order to manipulate the window size and read its properties. Unfortunately, these are all tied together and you can’t have one without the other. So, by receiving the right to access the window properties, the extension also receives access to the browsing history and all.

If this is true, it’s indicative of a big problem with Chrome’s extension security model.

The Lesson

After seeing three browser extensions go rogue in the past year, I sense that the Chrome Web Store has a big problem in the making.  In the meantime we just need to mitigate the problem by acting wisely.  There’s a number of lessons to be learned, so here’s my advice:

  1. Treat all browser extensions as suspicious.  Check their requested permissions, and if they ask for too much for their required needs then don’t install them!
  2. Always read the reviews and details of extensions before installing them.  You’ll learn a lot.  If they have a privacy policy, read it!
  3. Disable all extensions that you aren’t currently using, or don’t really need.  Out of sight is not out of mind.  Stick with just high profile extensions.  That said, the more users extensions have, the more likely they are to be sought after by malware operators, who purchase them and abuse them.
  4. Just because you don’t see anything wrong, doesn’t mean there isn’t anything going on under the covers.
  5. The old saying of “If the product is free, then you are the product” I guess unfortunately extends to browser extensions.

Go and check your browser extensions now.


It’s worth noting that all our browsing habits are being tracked anyway by Google, which is disconcerting enough as it is.  Between my browsing history being synced back to their servers, all search links going via them, storing all my email, and so on, it’s fair to say that they know way too much about me.  However, at least I’m well aware of this situation and have made my own decision to keep using their products based upon reading and agreeing to their privacy policies, and the fact that I get a worthwhile enough benefit in exchange.  But I never agreed to allow these extensions to spy on me, and that really disgusts me.

Customising Your Build Process

TL;DR

This article got much longer than I had originally intended, so here’s a summary for those with short attention spans, wondering whether they should bother reading further:

  • You should automate manual pre and post build tasks by customising your MSBuild script.
  • Customising your builds with MSBuild can actually be quite easy, and changes can be made rapidly using a technique I demonstrate.
  • The best way I’ve discovered to structure build script customisations is to store your custom tasks in a .targets file, and import the .targets file into your project file.
  • This technique means you don’t need to modify your project file each time you want to make a change to your custom tasks.
  • You can also write code directly in your build scripts using inline tasks!

Introduction

I’ve known for years that you could customise how your .NET applications are compiled by MSBuild, but for a number of reasons (which I’ll mention shortly) I’ve avoided doing so up until now, tending to specify commands as pre or post build events instead.  However, I’ve recently discovered what I think is a much better way to customise MSBuild scripts, which I’ll share with you in this article.  Before we do so, I’ll provide a bit of background info for those of you who are new to MSBuild.

What is MSBuild?

For those that don’t know, MSBuild is the short name for the Microsoft Build Engine.  When you compile your .NET applications in Visual Studio, TFS Build, or on the command-line, it’s MSBuild that’s doing all the work.

MSBuild follows a build script, which specifies what it should build and how.  If you’ve ever taken the time to look at the source of your project file (.csproj, .vbproj, etc), you’ll notice that it’s all XML.  You may or may not have realised it, but it’s actually a MSBuild script!  MSBuild parses the XML in your project file (along with any other files that it imports), and compiles your project accordingly.

The great thing is that you can customise this build script and add your own tasks to it to suit your project’s specific needs.  The possibilities this provides are almost limitless!

It’s beyond the scope of this article to detail the structure and features of MSBuild scripts in any sort of depth.  MSDN is the place to go for that sort of information.  In summary though, a build script may consist of:

Properties – key/value pairs used to configure builds.
Items – items (usually file references) that are to be compiled or used as inputs to tasks.
Item Groups – all items must be contained within one or more item group elements
Tasks – actually perform work within the build process
Targets – used to sequence tasks within the build process

More information on the can be found on MSDN here: MSBuild Concepts

Manual Processes are Bad!

So when should you customise your builds, and why?  If you find that you need to manually perform any task before or after your application has built, regardless of whether it needs to be done every time you press F5 in Visual Studio or only when your build server is doing a release build, then you should automate this task.  Being a developer, you should naturally always be on the lookout for repetitive tasks that can be eliminated with automation.  MSBuild is the tool you should be using for this job.  Or Nant, or custom build templates in TFS Build, etc, but you get the drift.  This article is about MSBuild though, so let’s stay focused.

For example, if you’re doing any of these things manually before or after a build (a few examples off the top of my head), then you should be automating the process immediately!

  • Incrementing a version number
  • Zipping up outputs
  • Transforming XML files
  • Installing an assembly into the GAC
  • Generating a NuGet package
  • Deploying the outputs
  • Modifying outputs in any way (such as renaming them, etc)
  • Copying outputs between projects
  • Generating documentation files
  • Obfuscating assemblies
  • Executing SQL statements
  • Excluding files or folders from being published

The vast majority of build script customisations will typically only run when performing a release build (which is hopefully being done by a build server!).  We’ll look at how your custom build script can check for this later in the article.  A nice thing about custom MSBuild scripts though is that they’ll also run when building the project in Visual Studio, which can make developing, testing, and debugging your customisations a lot easier.

Misconceptions

As I mentioned at the start of the article, I’ve known that you can modify project files in order to customise the build process, but I’ve avoided doing so due to a few misconceptions I had:

  • I thought each time I wanted to change something in the build process I’d have to edit the project file.  Modifying a project file in Visual Studio involves unloading the project, opening the project file, finding the right spot for the change, making the change, and then reloading the project it again.  This can be a frustrating and time consuming process, especially when the changes you make don’t work and you need to repeat the process.
  • I thought that if you wanted to write custom code in C# as part of the build process, you’d have to write it as a task, compile it as an assembly, and make it available somehow such that MSBuild could find it.  This seemed a bit too much effort for what was generally a minor task.
  • I was worried that modifications to project files are not easily visible to future maintainers of the application, and can lead to confusion and frustration due to “unexpected behaviour” (good programmers should always consider the impact that their customisations will have on the maintainability of the applications they’re working on).

None of these points are true when you use the technique I’m about to describe for customising the build process.

Why not Simply use the Build Events Tab in the Project Properties?

Previously, my alternative to customising the MSBuild script was to specify pre and post build event commands in the Build Events tab in the Project Properties window.  For cases which involve simply executing a command on the command-line, this does the job fine.  It’s certainly worked for me in the past.  However, a lot more flexibility can be gained by customising the MSBuild script, and it opens many further possibilities.

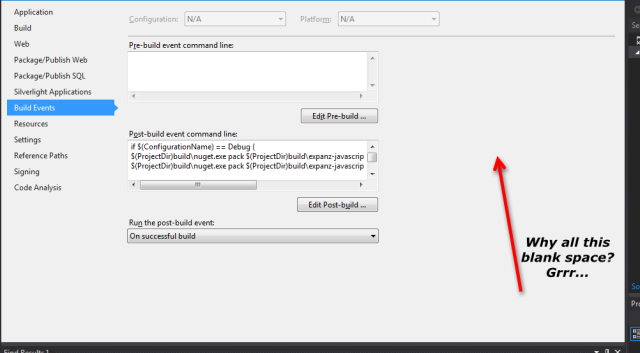
I also personally hate the Build Events tab with a vengeance.  I’m pretty sure that no-one has touched it since VS2002.  Commands are usually quite long, yet it insists on having a fixed width of about 390px for the text boxes used to configure the commands, regardless of the width of the document pane.

CustomBuild1

A Better Way

I was using the AjaxMin to bundle and minimise JavaScript files recently (more on that in a future blog post), and noticed how the documentation for its build task demonstrated using a separate targets file to define its custom build actions, which could then be imported into the main build script (i.e. the project file).  It suddenly struck me that this was the perfect mechanism to use when customising the build process of my projects.  Rather than having to add custom build tasks directly to a project file, I could simply maintain them in a separate targets file, which the project file could then import.  The benefits of this would be:

  • Modifying my project’s build configuration becomes very easy and rapid, and
  • The presence of the .targets makes it much more obvious to future maintainers that the build process has been customised, and it’s easy to see exactly what those customisations are.

Sure, I still needed to modify the project file to get it to import the targets file, but then no further changes would be required.  As you’ll see shortly, when I discuss inline tasks, it can be a huge benefit not having to modify your project file each time you want to make a change to your build script.

Configuring a Targets File

So let’s look at how you go about customising your build script using this technique.  The first step in the process is to create a targets file, and import it into your project file:

  1. Add a new XML file to the root of your project named CustomBuildProcess.targets.
  2. Add the following XML to it:

<Project xmlns="http://schemas.microsoft.com/developer/msbuild/2003">

</Project>

  1. Right-click on your project file in the Solution Explorer window, and select Unload Project from the context menu.
  2. Right-click on your project file again in the Solution Explorer, and select Edit [Project File Name] from the context menu.
  3. Find a line that imports a targets file.  For example:

<Import Project="$(MSBuildToolsPath)\Microsoft.CSharp.targets" />

  1. Add a new line after this, and add the following XML element:

<Import Project="$(MSBuildProjectDirectory)\CustomBuildProcess.targets" />

  1. Save the changes you’ve made to the project file, then reload the project by right-clicking on the project in the Solution Explorer window, and selecting Reload Project from the context menu.
  2. Try to build your project – it should build successfully.

Customising Your Build Process

You’ve now got a targets file, in which you can specify the customisations to your project’s build process.  How you write MSBuild scripts is really beyond the scope of this article, as that’s a whole topic in itself.  There’s plenty of information available on doing so on MSDN and the wider web though – I’d probably recommend this MSDN article as a good first port of call: Walkthrough: Using MSBuild

That said, I don’t think this article would be complete without a simple example of customising the build script.  So for this example, we’re just going to log a message to the output console.  The key concern here is when will your custom tasks execute?  There’s actually a number of ways that you could use to specify when your custom tasks should run, such as overriding the default targets defined in Microsoft.Common.CurrentVersion.targets (not recommended – see the comment from Chris Walters at the end of the post), or adding your custom targets to the existing default target definitions (which is not ideal, as you have to modify the .csproj file). For this example we’ll actually use the simplest way, which is by specifying which target our target should run before or after.  There’s a number of targets you can “target”, including Compile, Build, Rebuild, Clean, Publish, ResolveReferences, and ResGen, amongst the many others defined in the Microsoft.Common.CurrentVersion.targets file.  As you can see, there’s no shortage of extensibility points.  In this example, we’ll create a target that runs after the Compile target, and get MSBuild to write Hello World! to the Output window.  All you need to do is add the Target element below to your CustomBuildProcess.targets file:

<Project xmlns="http://schemas.microsoft.com/developer/msbuild/2003">
  <Target Name="SayHello" AfterTargets="Compile">
    <Message Text="Hello World!" Importance="High" />
  </Target>
</Project>

Note that it’s important that you set the Importance attribute to High.  Otherwise the message won’t display in the Output window unless you increase the output verbosity of MSBuild, a topic we’ll discuss further when it comes to debugging your customisations.

Now when you compile your project, the message is displayed in the Output window after the project has successfully built.

CustomBuild2

This was an extremely simple example, but it should help you at least get started customising your build.  There’s numerous tasks that are built into MSBuild which you can use, such as Copy, Delete, MakeDir, Exec, to name a few.  A full list of these with descriptions and examples can be found here: MSBuild Task Reference.  However, they are all very basic tasks, which is where the MSBuild Extension Pack and MSBuild Community Tasks projects come in.  These provide much more sophisticated build tasks that you can use, enabling you to work with FTP, the GAC, the registry, Active Directory, IIS, source control, XML, and much more.

Debugging Your Customisations

I thought I’d just touch on two tips to debug your build script customisations, and help you solve any issues you might have.

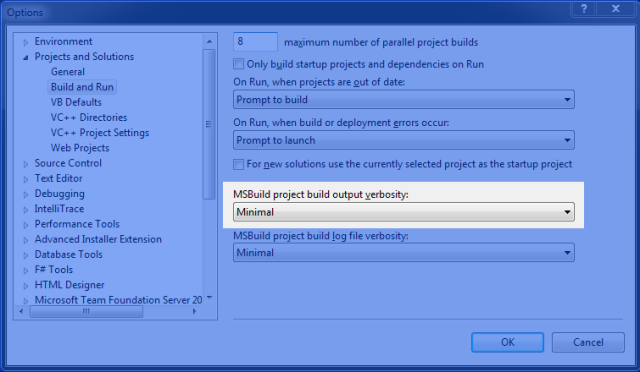
The first tip is to write messages to the Output Window, as demonstrated in the previous section.  The second is to increase the output verbosity of MSBuild in order to give you more of an insight into what’s going on.  You can change this in Visual Studio’s option dialog, under Projects and Solutions > Build and Run.

CustomBuild3

Using Inline Tasks

The build tasks provided out of the box with MSBuild, along with the community build tasks, will usually cover most of your requirements when customising your build process.  However, sometimes what you need done warrants writing your own custom build task, and even if it doesn’t it can often be easier to write just a bit of code to do what you need rather than mucking around with modifying the MSBuild script itself.

Traditionally, you had to create an assembly, write your custom build tasks in that, and then ensure it’s available to MSBuild when it runs.  But this incurred quite an overhead in configuration and management, so to solve this issue MSBuild 4.0 introduced inline tasks.  Essentially, inline tasks enable you to write code directly in the build script using your favourite .NET language (or even other languages if someone has developed a custom task factory, such as those for Powershell and the DLR provided by the MSBuild Extension Pack), and have it execute as part of your build process.  This is an awesome feature, and makes it so much easier to develop and maintain build customisations.  You can easily write code in a language that’s familiar to you, you’ve got the full .NET Framework at your disposal, and you’ve basically got almost limitless possibilities.

It’s when developing inline tasks that you’ll find locating your custom build tasks separately from your project file makes a huge difference.  You can iterate rapidly during the development of these inline tasks, and it’s very easy for future maintainers of the project to see exactly what’s going on.

I don’t want to get too deeply into how to write inline tasks as there’s pretty good documentation on MSDN already on this topic, however given that the targets file structure I’ve demonstrated is perfect for use when writing inline tasks, I think a simple example is in order.  Again, we’re just going to keep things simple and write a message to the Output window.

  1. The first step is to create a UsingTask element in your targets file.  You need to give the task a name, and specify the task factory and assembly file.  Since we’re writing .NET code for our inline task, the task factory will be CodeTaskFactory, and the assembly will be the MSBuild tasks assembly:
<Project xmlns="http://schemas.microsoft.com/developer/msbuild/2003">
  <UsingTask TaskName="MyCustomInlineTask" TaskFactory="CodeTaskFactory"
             AssemblyFile="$(MSBuildToolsPath)\Microsoft.Build.Tasks.v4.0.dll">
  </UsingTask>
</Project>

Note that these values will always be the same, assuming you’re just writing .NET code in your inline task.  Task factories essentially interpret and execute the code you write in your build script, so we’re pointing to the task factory class that manages this, and the assembly that it can be found in.  If you’d prefer to execute PowerShell script in your inline task, then you can use the PowerShellTaskFactory available in the MSBuild Extension Pack instead.

  1. The next step is to define your task (within a Task element), and write the code for it within a Code element, remembering to specify the language you’re using with the Language element:
<Project xmlns="http://schemas.microsoft.com/developer/msbuild/2003">
  <UsingTask TaskName="MyCustomInlineTask" TaskFactory="CodeTaskFactory"
             AssemblyFile="$(MSBuildToolsPath)\Microsoft.Build.Tasks.v4.0.dll
    <Task>
      <Code Type="Fragment" Language="cs">
        <![CDATA[
	  Log.LogMessage("Hello from an inline build task!", MessageImportance.High);
	]]>
      </Code>
    </Task>
  </UsingTask>
</Project>

Note that the CData elements are not required if your code doesn’t use XML characters such as (i.e. XML reserved characters), but it’s strongly recommended.

You can specify assembly references, using statements, and input parameters as required, which is documented on MSDN.

  1. The final step is to reference your task (using the name you gave it on the UsingTask element) in a target such that it will be executed:
<Project xmlns="http://schemas.microsoft.com/developer/msbuild/2003">
  <UsingTask TaskName="MyCustomInlineTask" TaskFactory="CodeTaskFactory"
             AssemblyFile="$(MSBuildToolsPath)\Microsoft.Build.Tasks.v4.0.dll>
    <Task>
      <Code Type="Fragment" Language="cs">
        <![CDATA[
	  Log.LogMessage("Hello from an inline build task!", MessageImportance.High);
	]]>
      </Code>
    </Task>
  </UsingTask>

  <Target Name="RunMyInlineTask" AfterTargets="Compile">
    <MyCustomInlineTask />
  </Target>
</Project>

Now when you build your project you should see the message appear in the Output window.

CustomBuild4

If the message doesn’t appear, try changing your MSBuild output verbosity option to Normal in Visual Studio’s options window, as described in the Debugging Your Customisations section of this article.  For some reason the Log.LogMessage method doesn’t seem to work exactly like the Message build task used earlier.  Even though the importance is set to High when using them both, the Message build task shows the message when the build output verbosity is set to Minimal, but the Log.Message method only shows the message if the build output verbosity is ramped up to Normal or higher.

This was a very simple example, but I have an upcoming blog post in which I’ll demonstrate implementing an inline task which is much more sophisticated.

Running Build Customisations on a Build Server

To be honest, I think most customisations to your build script will only need to be run when it’s being built on a build server.  From my experience, it’s rare to need to perform custom actions when doing a “desktop” build.  Many of the possible customisations I listed earlier in the article are things you’d only want done when creating a release build, and it’s not out of place to say that most teams should have a build server that does this for them.

Common build servers include TeamCity, CruiseControl.NET, and TFS Build. The technique outlined in this blog post works with all of these.

If this is the case and you’re using TFS Build, it may be worth investigating whether it would be better to customise your build definition’s template instead (build templates use Windows Workflow to define a sequence of activities to execute during the build, and can easily be reused across build definitions).  That said, I’ve done a lot of build template customisation work, and it’s a right royal PITA.  It’s not fun at all.  Testing and debugging customisations is a seriously slow and painful process, requiring checking in of the template to source control each time you make a change that you want to test.  It’s also hard to see what customisations have been made, making build templates a nightmare to maintain.  Anyway, that’s just my experience.

I did lots of work around customising TFS Build templates last year, and I might try and share some tips and recipes in future blog posts. Custom TFS Build templates very much have their place, particularly when implementing customisations that apply to multiple projects being built by your build server.  It may be a painful process, but is often the most appropriate choice over developing custom MSBuild scripts when implementing custom processes that only ever run on the build server.

If you do go down the path of developing custom MSBuild scripts but your custom build processes are to run only on the server, you can create a condition on your targets that check the value of the $(BuildingInsideVisualStudio) property.  It’s true when the project is being built from Visual Studio , and empty when hosted elsewhere (i.e. from the command line or a build server).  For example, the following target will only run when the project is built outside of Visual Studio:

  <Target Name="DoStuff" AfterTargets="Compile" Condition="'$(BuildingInsideVisualStudio)' == ''">
    <!-- My tasks -->
  </Target>

Conclusion

So we’re done!  In this article you’ve seen how you can implement MSBuild script customisations with reasonable ease.  I use this technique in many of my projects – hopefully you’ll agree that this is a pretty nice technique for customising your build scripts, and you’ll use it in your own projects too!

The best place to get more information on customising your build process is MSDN.  The section on MSBuild can be found here: MSBuild.

Relaunching My Blog, and a Silverlight Retrospective

After 2.5 years of radio silence, I’ve decided it’s finally time to relaunch this blog.  My last post was about the release of my Pro Business Applications with Silverlight 5 book, which just so happened to coincide with the “death” of Silverlight.  At the time, I had become burnt out from writing on top of maintaining a job, so between this and also finding the carpet swept out from underneath me given the fate of Silverlight, I no longer felt the need or desire to write any more.  I stand by my announcement that I will never ever write another book again, but I’d still like to take the opportunity via this blog to give back some of the hard won knowledge that I’ve gained to the developer community.  So I’m happy to announce that you’ll now start seeing renewed activity here, but with a new focus towards building professional business applications using HTML5 technologies (HTML, JavaScript, and CSS).

Before moving onto the next phase of this blog, however, I thought it might be worthwhile closing off the previous chapter, given that I had focused heavily on Silverlight, with a bit of a wrap up and a retrospective of Silverlight – a post-mortem if you may.  I think people tend to forget what a challenge it was to develop applications for the web just a few short years ago, and now unfairly (in my opinion) malign Silverlight and those who used it.  I’d like to set a few things straight, or at the very least detail my perspective on it, if I may.

Why Silverlight Received Traction

Silverlight had its roots in WPF, which automatically made it appealing to WPF developers.  Rather than just being bound to Windows, WPF developers could transfer their existing skillset to developing applications with Silverlight that easily deployed via the web, and could also run on Apple OS X!

I was not a WPF developer at the time – instead I had been developing various web-based business applications using ASP.NET WebForms and the Microsoft AJAX Toolkit.  These applications worked, and impressed clients and users, but it was certainly primitive and flawed.

Remember, the ASP.NET MVC CTP only appeared at the end of 2007, and didn’t hit V1.0 until March 2009!

My interest in Silverlight started in the Silverlight 2 Beta days (mid-2008), before Silverlight had a clear business application focus.  However, I immediately saw its potential in this area, and started writing articles on the SilverlightShow.net website in 2008, specifically targeting building business applications with Silverlight – one of the first, if not the first to do so.  Silverlight enabled me to write well-structured applications using C# on both the server and the client, and create rich user experiences with ease, without worrying about cross browser concerns.  Remember, this was a time when:

  1. Chrome didn’t exist (its first release only came in September 2008), and JavaScript on all other browsers ran incredibly slowly.
  2. IE6 was still an extremely popular browser.
  3. HTML5 support in browsers was still a long way off.
  4. CSS rendered inconsistently between browsers, and was limited in features.
  5. Libraries like knockout.js, backbone.js, require.js, breeze.js,  etc didn’t exist yet.
  6. Single Page Applications (SPAs) didn’t really exist (beyond GMail, which had the support of Google behind it).
  7. Frameworks like angular.js, durandal.js, and Ember.js didn’t exist yet.
  8. All the browsers behaved differently, and testing was a nightmare. (It still is, but less so)
  9. Mobile devices were not widespread.  It’s hard to believe, but there was a time when most mobile phones weren’t able to browse the web, and tablets were big clunky things running full Windows.  The iPhone only came out in 2007, and the iPad only in 2010.
  10. Browser plug-ins were used widely – particularly Flash.
  11. Installing the .NET Framework needed a 100+mb download, when Silverlight was only a 5-7mb download.

The above factors contributed to making web application development a nightmare.  This made Silverlight a very attractive platform for us as developers.  Silverlight started getting much more love from Microsoft than WPF had ever seen, and was rapidly gaining traction with developers accordingly.  Microsoft’s message was essentially “if you’re building business applications for the web, you should be using Silverlight”.  WPF was getting little to no attention, and Silverlight was getting lots, so given the choice it made sense to focus on that instead of WPF.  Especially given that from version 3, Silverlight was obviously much more focused towards business application development than WPF was.  It had a DataGrid (for better or worse) long before WPF, validation summary and validation styles on input controls, a DatePicker control, PivotViewer control (from version 4), the Visual State Manager, RIA Services, text in WPF was fuzzy and gave users headaches (until .NET V4.0 fixed this issue), and it could run on Apple OS X.  They are just some of the benefits off the top of my head.  Interestingly, Silverlight has many features that even “Modern UI” applications (i.e. Windows 8 applications) still don’t support.

Why Silverlight Started to Lose its Shine

Silverlight was inevitably misused at times.  I personally never saw Silverlight as being suitable for use on public facing websites (with the exception of sites that could take advantage of its awesome streaming video support), but I strongly believed in its ability as a solid technology for building web applications upon.  As in, data centric applications which typically (but not always) ran within a corporate network.  And it suited this scenario very well.  But it would obviously provide a barrier to entry when it comes to the “drive by” nature of web surfers on the open web.

Silverlight also had a perception issue.  People were expecting it to be something it was never realistically going to be.  In particular, there was a desire for Silverlight to run on mobile devices.  Unfortunately, that was just never going to happen, and some saw that as being an indicator that Silverlight had failed.  That said, given the rapidly rising use of Apple Macs and the fact that it ran on these machines meant that it still had a major advantage over WPF.

Over the following years, Silverlight was advancing rapidly, version to version.  Silverlight really matured when it hit version 4, however, during this time, the “native” web was also maturing rapidly.  We started to see JavaScript libraries appear (Backbone.js, Knockout.js, etc) which made developing native web applications much easier and more robust.   HTML5-supporting browsers started gaining widespread adoption, reducing the need for plug-ins.  The rise of iPad use within businesses, and Apple’s steadfast refusal to support Silverlight on it, started working against Silverlight.  Silverlight was starting to lose its competitive advantage, and it started to become much more viable to build business applications using native web technologies.

And Then Everything Fell Apart…

Silverlight was still getting a strong focus, marketing, and love from Microsoft, until suddenly it just stopped.  Just like that, it disappeared overnight, and no-one from Microsoft could be drawn in to talk about Silverlight and its future.  We’d heard some rumours that Silverlight may not have a future, care of ex-Silverlight program manager Scott Barnes (aka @MossyBlog), and this appeared confirmed when Bob Muglia, president of the Server and Tools division let it slip that Microsoft’s “strategy has shifted” toward HTML5.

Mr. Praline: I’ll tell you what’s wrong with it, my lad. ‘E’s dead, that’s what’s wrong with it!
Owner: No, no, ‘e’s uh,…he’s resting.
Mr. Praline: Look, matey, I know a dead parrot when I see one, and I’m looking at one right now.
– Dead Parrot Sketch, Monty Python’s Flying Circus

The silence on Silverlight’s future spoke more than words, and was the worst thing Microsoft could have ever done.  The resulting unease and uncertainty inevitably led to the ecosystem collapsing, with tens of thousands of developers suddenly left out in the cold.  Not only were developers cheated, but the effects extended to:

  • Contractors and development shops who had projects cancelled
  • Authors whose book sales fell through the floor
  • Component vendors who had invested heavily in developing components that nobody wanted any more
  • Businesses who had invested in a technology that had no future

Having personally invested greatly into Silverlight, and falling into multiple of the above categories, I was one of the thousands that felt the repercussions.

It’s interesting to now see companies that promoted Silverlight to their clients and had developed many Silverlight applications now marketing themselves as specialising in migrating Silverlight applications away from the platform.

My Position on Silverlight’s death

I am still, to this day, monumentally pissed off with Microsoft and their handling of Silverlight’s demise.  It just never needed to be as bad as it was.  I personally felt that Silverlight had reached a reasonable maturity by version 5, and didn’t really need to go too much further.  Actually, I think Silverlight went too far in a number of aspects.  In particular, adding 3D support to Silverlight 5 was completely unnecessary.  It added to the runtime size, I suspect it was the reason for Silverlight 5 being released so long after Silverlight 4 (18 months), and I’m still yet to see any application that ever used it.

That said, Silverlight was never perfect.  These points from Paul Stovell about WPF all apply to Silverlight too, and are quite valid criticisms.

“Native” web technologies have really matured, and for many business applications there now is really little need to build them on a technology like Silverlight.  There was a very steep learning curve, but I have quite happily been building applications with HTML, JavaScript, and CSS for almost 2 years now.  It has its ups and downs sometimes, but then again so did working with Silverlight!  JavaScript application frameworks have now come of age, though they are still very much in flux (Angular and Durandal are now in the process of merging, for example).  It really is possible to create well-structured rich business applications these days for the native web.  It’s funny, I was recently flicking through my Silverlight 5 book, and I realised how many of the topics can be handled easily in JavaScript now.  Sure, there’s a few things that only Silverlight can do, but for the most part, the native web has well and truly caught up.

I do miss the Silverlight PivotViewer control though.

Microsoft obviously had the foresight to see this, however, there was no reason why Silverlight needed to die.  All it needed was an inclusion in the product line roadmap (a minor and drawn out release schedule would have sufficed), some acknowledgement as still being an important part of the Microsoft family of products, and some continuing promotion of its value as a business application platform.  The silence from Microsoft just reinforced the consensus that Silverlight was dead.  I can’t think of a worse way to handle this scenario that could have caused any more damage than it did.

The damage that’s been caused extends far beyond just the Silverlight ecosystem.  The damage also extends to a major loss of developer faith in Microsoft as a platform provider, which can’t be understated.  This is especially important in an era when their flagship operating system (Windows 8) is struggling to gain traction, while its key competitor (Apple OS X) is surging in popularity.  Simultaneously, mobile devices and open technologies like the web are becoming more and more capable, and tying people less to Microsoft platforms.  I’ve discussed with numerous fellow developers how we’ve each lost the faith required in Microsoft to invest our personal time in their newer technologies – ultimately this will only hurt Microsoft.

My Experience in the Aftermath of Silverlight’s Demise

I lost a few things when Silverlight died.  Firstly, I lost my hard won standing in the developer community – suddenly nobody was really interested in what I had to say any more.  I had been running the Silverlight Designer and Developer Network, but numbers fell away rapidly, until it was no longer viable.  I refocused on building WPF applications, and eventually onto HTML5 applications.  WPF wasn’t being advanced, so there wasn’t a lot to talk about there, and I was far too new to the web development community in order to stand up as an expert (because I wasn’t).

Boxes Of Books

Boxes Of Books

The one thing, however, that saddened me the most was what happened with my Silverlight 5 book.  My Silverlight 4 book had been well received, but I felt that I could do much better.  So I practically rewrote it (adding 200 pages in the process) for Silverlight 5.  I was (and am) so proud of what I had accomplished with that book – it is so much better than the Silverlight 4 version.  I carefully crafted something that was really well structured, well written, and would guide developers through building business applications with Silverlight without getting lost.  The few reviews I got backed that up.  If you haven’t written a book (and I typically recommend against it), it requires a massive amount of effort.  I worked 7 days a week, for 6 months on it (fitting a job in-between).  Unfortunately, it was all for nothing, as few people ended up buying the Silverlight 5 version, given that it came out after the doom and gloom hit the Silverlight ecosystem.  Sales fell flat (as happened for all Silverlight related books), and all the effort I put in was not rewarded.  As it is, most of the copies sent to me by the publisher are still sitting in the cupboard (pictured), and I don’t really know what to do with them all, as nobody wants them.  If you’re interested and are in the Sydney area, let me know – I’d be happy to give them away to anyone who will use them.

The Future of this Blog

I now plan to start posting a lot more on this blog.  I’m still focusing on business applications for the web, just the technologies used will be different.  I will throw in some posts about WPF and other topics at times, but the key focus will be on building applications using native web technologies.  One thing I’d like to do is some video tutorials, and I hope to include them as a part of many posts where appropriate.  I’ve got a lot of things to blog about (my last project alone generated 111 ideas that I noted down to blog about) – let’s see how I go getting through them!

Pro Business Applications with Silverlight 5 Now Available

I’m happy to announce that my book Pro Business Applications with Silverlight 5 has now been released.  Preparation of this edition has been an enormous task, and I’m so glad to see it finally make it out into the wild.  What I had planned to be a short task of simply updating the Silverlight 4 edition of the book with the new features available in Silverlight 5 blew out to become a huge endeavour. Not only did I update the book for Silverlight 5, but I also rewrote much of the existing content to make it easier to read, and expanded upon the concepts I had covered in the previous edition (the chapter on MVVM got a huge update, as did discussion of collection views, along with many other topics). In addition, I also covered many new concepts too (such as MEF, and modularising your application).  All this new content has added another 200 pages or so to the book from the previous edition.

Most importantly, I have peppered the book with workshops, that walk you through the steps involved in implementing the topics covered in the book.  All the steps you need to follow are listed right there in the book, saving you the need to read a mass of text and interpret it in order to apply it to your project.  This makes it easy for you to apply the principles being covered without fumbling about and having to rely on any prerequisite knowledge.

If you’re not familiar with the Silverlight 4 edition, I took what I believe to be a rather unique approach, in that I attacked the subject of how you build business applications in Silverlight in a somewhat linear fashion.  Many (most?) technology books tend to be focused on the technology itself, with the topics not organised in order of how you would use them.  As a reader of these sorts of books, you’re required to apply the technology to your problem.  With my book, I took a problem-centric approach.  The problem being that you’re building a business application, and the book showing you how the technology can help you reach a solution, from beginning to end.  Ideally you’ll read  and follow this book from start to finish.  That said, it is still usable as a reference book if you so wish.

To demonstrate the process that the book follows, here’s the table of contents:

  1. Getting Started with Silverlight
  2. An Introduction to XAML
  3. The Navigation Framework
  4. Exposing Data from the Server
  5. Consuming Data from the Server
  6. Implementing Summary Lists
  7. Building Data Entry Forms
  8. Securing Your Application
  9. Styling Your Application
  10. Advanced XAML
  11. Advanced Data Binding
  12. Creating Custom Controls
  13. The Model-View-View Model (MVVM) Design Pattern
  14. The Managed Extensibility Framework
  15. Printing and Reporting
  16. Out of Browser Mode and Interacting with the Operating System
  17. Application Deployment

The benefit of this linear approach is that the workshops actually guide through the process of building a business application in Silverlight step-by-step.  You can follow through the workshops in order, and have a fully functional application at the end.

All in all, I’m actually really proud of this edition of the book.  I put a lot of work into it, and it’s become the book that if I were building business applications in Silverlight, I would want to have it by my side.

It saddens me greatly that Microsoft have let the “Silverlight is dead” rumour get out of hand, and depresses me that many people have been turned away from using Silverlight, and will not buy my book because of it.  I strongly believe that Silverlight is one of the best technologies available for building line of business applications, and I see it being so for quite some time yet.  It’s a mature platform, with a strong community around it.  Sure, Silverlight can’t beat HTML5’s reach, but you’ll no doubt find it quicker and easier to develop applications in Silverlight when there’s no need for your application to run on an tablet or phone.

If you are planning to buy the book from Amazon, please consider clicking on the cover of the book above, which will use my affiliate link to take you there.  And once you do have it and have been reading it, it’d be great if you could leave a review!

Now that the book is done, I’ll be doing some more blogging now.  Not everything I wanted to write about made it to the book, so I’ll be covering some of those topics.  Feel free, however, to suggest a topic in the comments below, and I’ll see what I can do!

September Meeting

For those of you wondering about this month’s meeting (which normally would be on tonight according to the normal schedule of the third Monday of the month), it’s been postponed for a week (to the 26th of September) so that we can get Jose back from BUILD to tell us all the exciting stuff he’s learnt, what XAML’s future is in Windows 8, and what other news has finally been unembargoed.
Of course, the release candidate of Silverlight 5 was also released recently, so I may talk a bit about that if we have time.
Note that we have a new room at the City Hotel starting this month, with it being held in the “Emperor Lounge”. We meet at 6pm, with a 6:30pm start.
Sorry for the late notice!  Hope to see you there…

What’s New in Silverlight 5

I presented “What’s New in Silverlight 5” at the Sydney Silverlight Designer and Developers Network meeting (which I run), focusing on the new business application related features in Silverlight 5 (Jose Fajardo covered the new 3D features). You can download the source code for the application I wrote demonstrating the new features here (also includes my PowerPoint slides):

Download

The sample currently demonstrates the following new features in Silverlight 5:

New XAML Features

– Custom markup extensions
– Implicit data templates
– Binding in style setters

New Debugging Features

– Setting a breakpoint in XAML to debug a binding

New Control Features

– RichTextBox overflow
– ClickCount
– ListBox/ComboBox type ahead searching

New Elevated Trust Features

– Elevated Trust inside the browser
– Create/display new OS windows
– WebBrowser and toast notifications whilst inside the browser
– Unrestricted access to the file system (without user involvement)
– Default file name in SaveFileDialog

TechEd Australia 2010 (+ Upcoming SilverlightShow.net Webcast) Sample Application

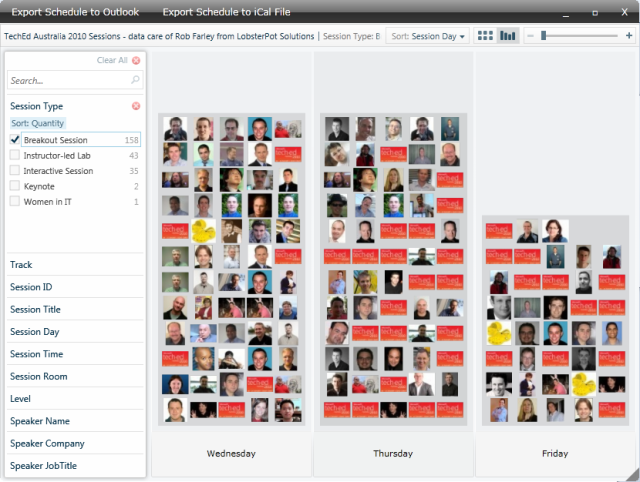
This is the sample application for my TechEd Australia 2010 session on Taking Silverlight Applications Outside the Browser, and my webcast for the SilverlightShow.net website of the same name. This sample implements a schedule builder for the TechEd Australia 2010 conference, which it does so by displaying the sessions using the PivotViewer control (http://www.microsoft.com/silverlight/pivotviewer/), like so:

The details of the corresponding session are displayed when you zoom in on a speaker’s photo. You can then hover the mouse over the photo, and an add/remove icon will appear that you can use to add or remove the session from your schedule.

You can then export your schedule to Outlook (when running outside the browser with elevated trust permissions), or to an iCal file. The conference ran between 24-27 of August, 2010, so you will find the data in your Outlook calendar then.

This application demonstrates the following Silverlight OOB features:

– Checking the whether the application is running outside the browser
– Checking the whether the application is installed
– Checking the whether the application has elevated trust permissions
– Detecting when the install state changes
– Toast notifications
– COM Interop to create appointments in Outlook
– Checking for updates to the application
– Custom chrome
– Writing directly to file

This application is also a good example of how the PivotViewer control can be used to create impressive applications.

Note that the toast notification ideally would be used to display a notification to the user 10 minutes before their next session. However, since the conference is over, and implementing it like so would be hard to demonstrate, the notification will simply be displayed when the application is running outside the browser, and the user adds a session to their schedule.

I’ve split the application into two downloads – one for the source code, and one for the data. This means you don’t need to download all the data if you only want to look at the code (although you will need the data to run the application). If you wish to run the application, you will need to unzip the data into your Web project’s folder. Don’t worry about adding the data to your Web project. There are *a lot* of files, and it will take a long time. Simply unzip the data into the Web project’s folder, such that the .cxml file is in the same folder as the HTML/ASPX page that hosts the Silverlight application.

You can download the source code here:

http://www.box.net/shared/s133o7ge6g

And the data here:

http://www.box.net/shared/b3mt73kor4

Note that to run this project, you will need the PivotViewer control, which you
can download from here: http://www.silverlight.net/learn/pivotviewer/.

My thanks go to Rob Farley of LobsterPot Solutions who collated and processed the TechEd data, and kindly gave me his permission to use it in this demo.

If you missed my presentation, or didn’t make it to TechEd, you can catch me doing it again for the SilverlightShow.net website as a webcast next week.  The details of this webcast are here: http://www.silverlightshow.net/news/Free-SilverlightShow-Webinar-Running-Silverlight-Outside-the-Browser-and-with-Elevated-Trust.aspx.  It’s scheduled for September 7, and will go from 8am – 9am PDT.  This is 1am Sydney time, and you can get your local time here.  Miss that, well it will be posted online for you to view at your leisure.

Everything I cover is discussed in further detail in chapter 14 of my book Pro Business Applications with Silverlight 4, which has just been released! 🙂

My Author Tips

As I mentioned in my last few (very sparse) blog posts, I’ve spent the better part of a year writing two books back to back – Professional Visual Studio 2010 for Wrox (as a co-author), and Pro Business Applications with Silverlight 4 (for Apress).  How I came to undertake two books is a long story that I won’t go into here.  Fair to say, I had no idea what I was getting myself into.  Writing is a long arduous process of working seven days a week, pretty much around the clock, with pretty much no time for anything else in-between.  It takes a huge toll on your sanity, and certainly isn’t worth it financially.  Writing one book is bad enough, but two is pretty much insane.

I signed the contracts for the books (different publishers) at roughly the same time, thinking that I could do both books concurrently, but I was wrong.  Luckily circumstances led to the Silverlight 3 edition of my Apress book being canned in favour of a Silverlight 4 version, meaning that I could do the two books back to back.  Thankfully the whole process is now over (finally!), with the VS2010 book being released back in late April, and with the Silverlight book now in the production phase.

Anyhow, the purpose of this post is to provide other authors who might have made the insane decision to write a technical book with some tips that I’ve come up with along the way.  If you’re an author too, I’d love to hear any other tips you have by leaving a comment.

Tip #1 – Harness Word’s Autocorrect feature for your own purposes

This is my absolute favourite tip.  Unfortunately I only came up with it about 3 months ago, but since then it has saved me a lot of time and keystrokes.   Word has an autocorrect feature that will take common misspellings (such as ‘teh’ instead of ‘the’) and fix it automatically for you.  Actually the publishers tell you to turn this off (because it changes some character combinations to other characters that they don’t like/support), but my advice is to leave it on, and remove these mappings if necessary.

I was finding that I was commonly typing ‘Silvelright’ instead of ‘Silverlight’ (I’m not the only one who suffers this, as evidenced by typing the misspelling into Google), and decided to add it to the autocorrect in Word to save me manually fixing it.  Then I had a thought.  I could get the autocorrect to expand abbreviations for me.  I could get Word to insert ‘Silverlight’ when I just typed ‘sl’.  When writing a book on Silverlight, where I typed that name/word repeatedly, this was a big saving.  Not only did it type the name right, but it also required just 2 characters instead of 11.  Awesome!  It was a major productivity boost.  Other useful mappings include:

  • Inserting multiple words with a single abbreviation – such as changing ‘ui’ to ‘user interface’, for example.
  • Separate mappings for both the singular and plural uses of a word.  The autocorrect kicks in when you press space at the end of the word.  Therefore, if you use both the singular and plural of a word (‘application’ and ‘applications’ for example), map a separate abbreviation for each – ‘app’ to ‘application’, and ‘apps’ to ‘applications’.
  • Inserting hyphens into words.  You can get the autocorrect to insert hyphens where necessary – for example automatically change ‘plugin’ to ‘plug-in’.
  • Inserting chapter references.  In my text, when a concept was covered in another chapter, I’d refer to it like so: ‘as discussed in Chapter 10 – Advanced XAML and Data Binding’.  Instead of typing this every time, I mapped ‘Chapter 10 – Advanced XAML and Data Binding’ to the abbreviation ‘ch10’.  Of course, the name of the chapter ended up being stripped out in the copy editing process (making this example slightly less relevant), but you might find it worthwhile.

The possibilities are endless :), just as long as your abbreviation isn’t a word itself.  For example, ‘vs’ would be no good as an abbreviation for ‘Visual Studio’, but you could preface it with another special character to make the abbreviation unique (for example, ‘^vs’).
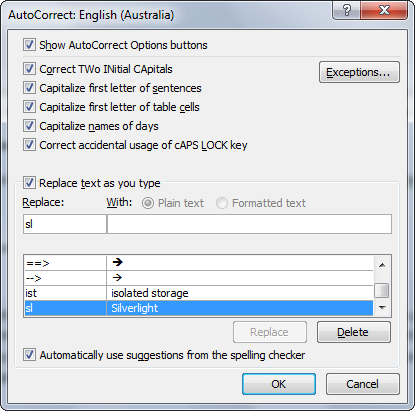
To get to the autocorrect settings requires you to go through a myriad of menus and dialogs in Word, so I attached a keyboard shortcut to it.  I attached Alt+Shift+T, though I can’t remember why I used that particular combination now.  Here are some instructions on how to do so anyway: http://word.tips.net/Pages/T000425_Shortcut_for_AutoCorrect_Dialog_Box.html.

Caution: You get so used to using abbreviations when writing that you start doing it when writing emails, etc, and getting annoyed when they don’t expand :).

Tip #2 – Document Map and Styles panes

Another favourite tip of mine is to use the Document Map in Word.  Go to the View tab on the ribbon, and select the Document Map check box in the Show/Hide panel.  This will show a panel to the left of your document, containing its structure (based upon the headings used).  This has two primary benefits.  It will enable you keep track of the document’s structure, and also allows you to quickly navigate to a location within the document.

Another useful pane is the Styles pane, enabling you to select a style to apply to the text.  Press Ctrl+Alt+Shift+S to display the pane.  As the list of available styles can be rather long, you can filter the styles displayed to just those used in the document (by clicking on the Options link at the bottom of the pane, and selecting the In Use option as the selected styles to show), however filtering the list this way is only useful once you’re well into the document and have already used the styles in the document that you want available.  Of course, even better than using the Style pane is if you can associate (and remember) keyboard shortcuts for each style.  This makes things so much easier if you can.
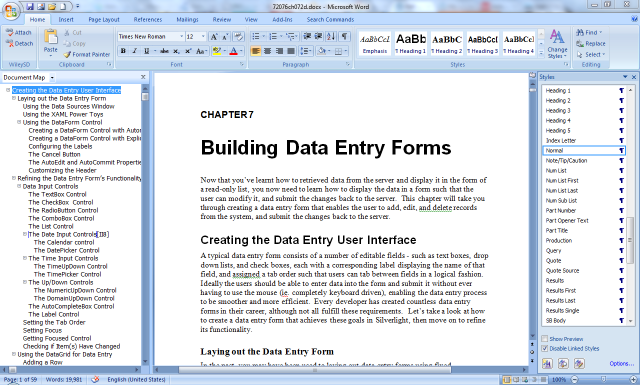
In tip #7, I have a macro (to which I assign a keyboard shortcut) which sets the screen up just the way I like it, with these two panes visible.

Tip #3 – Use the Pure Text utility to convert formatted text to plain text

As a writer, you are constantly copying code and other formatted text into your document, where you don’t want to keep the original styles.  You can always copy the text to Notepad first, but that’s a pain.  You can use the plain text paste option in Word (using the smart tag), but that’s another annoying step too.  The Pure Text utility however makes pasting pure text into the document much easier.  It sits in your system tray, and when you press Win+V it will take what’s in your Clipboard and insert it into your document without the formatting.

Another side tip – rather than pasting code into the document, selecting it, and then setting the code style on it, simply set the code style on the line where you are pasting first, and then paste the code in (using the Pure Text shortcut).  That at least removes the step of selecting the text for formatting.

Tip #4 – Use a guideline in Visual Studio to help you restrict the length of your lines of code

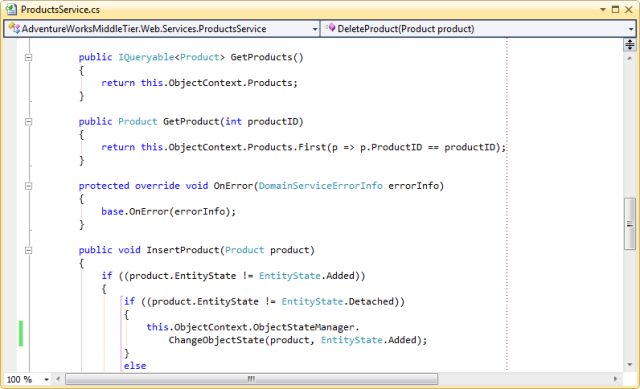
In order to fit within the width of a page, lines of code must be a maximum of 84 characters wide.  Trying to check that you’re within this limit line by line is a pain, but you can use a guideline to mark out this point in the code editor in Visual Studio, which you can then keep within.  There are a few ways you can do this, but the easiest way (now) is to use the Visual Studio Productivity Power Tools to activate and configure it.

To insert a guideline (assuming you have the Visual Studio Productivity Power Tools installed):

  1. Locate the position in the editor where you want to insert the guideline.  You can see in the status bar what column number you are at, so keep going across until the column is showing 84.
  2. Right-click in the editor at this position, and select the “Add guideline” menu item from the context menu.

This will display a dotted ine at that position, as shown in the image below:
Tip #5 – Create a document linking all chapters

I found it handy to create a document that contained links to each chapter’s document.  Initially, I had a document that I used to collate all the concepts and points I wanted to cover in the book.  Whenever I came up with something that should be covered, I noted it down in that document.  By rearranging the concepts and points into some sort of logical order, the chapter structure then started to form.  This resulted in a document containing a heading for each chapter, and the concepts and points to be covered in a chapter below its heading.

When I created a document for a chapter, I would then link the heading for that chapter to the document.  The steps to do this are:

  1. Select the heading text.
  2. Go to the Insert tab on the ribbon, and press the Hyperlink button.
  3. Locate the document to link to, and press OK.

This document then became a useful launch point to get to a given chapter.  There are other ways to be able to easily open a given chapter, but I liked this method as I often had this document open (appending to it when I had new ideas for a chapter, and determining which chapter I wanted to reference in the chapter I was currently working on).  I then pinned this document to the shortcut I had to Word in my taskbar (in Windows 7), so it was always easy to open.

Tip #6 – The Search Commands add-in for Word

Even after a spending close to a year working with Word 2007 as my primary tool, I still get lost finding various functions.  The Search Commands add-in for Office 2007 luckily comes to the rescue, enabling you to search for the function you are after and activate it.  This add-in can save a lot of frustration.

Tip #7 – Shortcuts, shortcuts, shortcuts (and macros)

Performing actions with the mouse is such a waste of your time, and having to constantly use the mouse to find and activate functions leads to frustration and a loss of concentration.  Configuring, memorising, and using keyboard shortcuts is the solution to this problem.

Preconfigured Shortcuts

My favourite preconfigured shortcut is Shift+F7, which displays the thesaurus pane.  Especially when I started writing, this came in very handy, as although I’ve always been well read and fairly good with the English language (spelling, grammar, correct use of there/their/they’re, etc), I’m simply hopeless at pulling the word out of the air that I’m after.  I know the word I want, but I just can’t put my finger on it.  Luckily I’ve improved in that area in the last year, but early on I’d often regularly refer to the thesaurus to try and track down the word I wanted to use.  Another favourite preconfigured shortcut is Alt+P to insert a picture.

Configuring Your Own Shortcuts

One of the big problems with Word however is that it has so many damn shortcuts already configured, but rarely for the ones that you want to actually use.  I ended up just setting up my own mappings, overwriting what was already configured by default.  These usually consisted of Shift+Alt+ a meaningful key (though sometimes I omitted the Shift key).

In the reviewing process, the shortcuts that I configured and found most useful were Alt+. (to go to the next change, and Alt+, to go to the previous change.  Why those?  Well the characters above them are the angle brackets, so it was like pressing Alt+> and Alt+< to go back and forth between changes.  It made sense to me at least.  YMMV.

Writing Macros

I then took things further and started writing macros.  Writing VBA code is no fun at all, so I tended to only do it when it would save me a lot of time.  Usually I’d start by recording a series of actions to get some of the code in place, and then use that as a base to refine the macro.  Some examples of macros I created are below.

Configure Your Workspace

An annoying thing I’ve found about Word is that it doesn’t really allow you to set up a workspace as such.  Being a pedantic and finicky person, I want things set up the way I like them.  Visual Studio remembers your workspace layout for you, but Word doesn’t.  I wanted the Document Map and the Styles panes to appear (as discussed in tip #2), the zoom level of the document to be 100%, and the pictures to actually appear in the document (more about that shortly). Since Word didn’t remember this layout for me, I created a macro to set it all up, and assigned it the key combination Shift+Alt+C.  This macro is below:

Sub ConfigureWordWorkspace()
    ActiveWindow.DocumentMap = True
    Application.TaskPanes(wdTaskPaneFormatting).Visible = True
    ActiveWindow.View.Zoom.Percentage = 100
    ActiveWindow.View.ShowPicturePlaceHolders = False
End Sub
The line to not show picture placeholders was due to me finding (for some unknown reason) that images weren’t appearing in some documents.  This caused me a lot of frustration, and made me think that the document had become corrupted.  I ended up discovering that there was an option deep in Word to turn off the display of images (on a per-document basis) that someone who opened the document previously must have turned on.  I added this line to set this automatically for me.

Hide Changes (But Retain Comments)

The documents went back and forth between myself, the editor, the coordinating editor, the technical editor, and others, with the Track Changes feature turned on.  As changes are made however, the document becomes really ugly showing all these changes.  You can hide them easily by selecting Final from the Display For Review dropdown, but that also hides the comments, which I still wanted to see.  To hide the marked up changes but keep the comments required a laborious process of unchecking the markup you didn’t want to see.  So I wrote a macro to do it for me:

Sub HideTrackedChangesMarkup()
    With ActiveWindow.View
        .ShowInkAnnotations = False
        .ShowInsertionsAndDeletions = False
        .ShowFormatChanges = False
        .ShowMarkupAreaHighlight = False
        .Zoom.Percentage = 100
    End With
End Sub

Insert Production Notes

This tip will probably only be of interest to Apress authors.  Essentially we needed to include a production note before our images, specifying what image file needed to be inserted into the chapter at that position.  This was another laborious task, so again I wrote a macro to search for the images in the document and insert a corresponding production note right before them.  Yeah, I know the code is a bit dodgy (I banged it together pretty fast going for function over form), but it works:

Sub ReplaceImages()
    With ActiveWindow.View
        .ShowRevisionsAndComments = False
        .RevisionsView = wdRevisionsViewFinal
    End With

    Dim chapterNumber As String
    chapterNumber = InputBox("Chapter number:")

    Selection.HomeKey Unit:=wdStory
    Selection.Find.ClearFormatting
    Selection.Find.Replacement.ClearFormatting

    With Selection.Find
        .Text = "^g"
        .Replacement.Text = "[Some remembering if needed]"
        .Forward = True
        .Wrap = wdFindContinue
        .Format = False
        .MatchCase = False
        .MatchWholeWord = False
        .MatchWildcards = False
        .MatchSoundsLike = False
        .MatchAllWordForms = False
    End With

    Dim figureNumber As Integer
    Dim isFound As Boolean
    figureNumber = 1

    Do
        isFound = Selection.Find.Execute

        If isFound Then
            Selection.MoveLeft Unit:=wdCharacter, Count:=1
            Selection.TypeParagraph
            Selection.MoveLeft
            Selection.Style = ActiveDocument.Styles("Production")
            Selection.TypeText Text:="Insert 72076f" + chapterNumber + Format(figureNumber, "00") + ".png"
            Selection.MoveRight
            Selection.MoveRight
            Selection.MoveRight
            figureNumber = figureNumber + 1
        End If
    Loop Until Not isFound
End Sub
If any authors have handy tips for managing figures and their associated image files on disk, I’d love to hear about them.  One of the most frustrating aspects of writing occurred when I decided to insert a new figure above numerous other figures already in the document.  I’d then have to change all the numbering for the figures below it, and then update the file names of the corresponding files on disk.  If I had my time again, I’d write a macro or something to help manage the images and their references intelligently.  Unfortunately, I just never had the time to do so.  Do you have a better process for managing this yourself?

Insert a Normal Quote Character

As a final tip, when you’re modifying code that you’ve pasted into Word, you don’t want to use Word’s smart quotes that it likes to use.  Instead, you want to insert a standard quote character (“).  I found it annoying having to copy an existing quote character from elsewhere, so again I wrote a macro to insert the character for me (which I assigned Alt+’ as its keyboard shortcut to quickly insert the character).  My code for this macro is below:

Sub InsertQuoteCharacter()
    Selection.InsertSymbol 34
End Sub

Tip #8 – Folder structure on disk

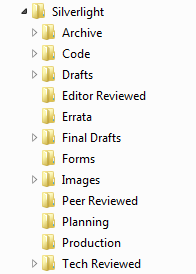
Staying organised when writing a book is vital.  Otherwise, things will quickly get out of hand.  For me, having a well structured folder hierarchy to maintain all the files associated with the book was a key step in staying organised.  You can see the folder hierarchy that I’ve created in the image below:

A quick explanation of each:

  • Archive – I dump files in here that I no longer want, or before deleting large sections of them.  This is more or less redundant if you use Subversion for versioning (discussed in the next tip).
  • Code – each chapter has a corresponding solution, each maintained in their own folder under this Code folder.  I name the folders and the solutions like so: ChapterXXSample, where XX is the chapter number (with a leading 0 if a single digit, eg. Chapter07Sample).
  • Drafts – the first drafts of each chapter go in this folder.
  • Editor Reviewed – this and the Tech Reviewed folders should technically just be a single folder.  The process is that you send your chapter away, the editor and the technical reviewer comment on them, and it is then returned to you for the final draft process.  That didn’t quite work properly for me (long story, predominantly my fault), and I ended up getting each chapter back from each person separately.  So I put the version from the editor here, and the version from the technical reviewer in the Tech Reviewed folder.  Technically, this folder shouldn’t really exist.  The single version you get back should go into the Tech Reviewed folder.
  • Errata – I put documents containing the back cover text, preface, acknowledgements, etc in this folder.
  • Final Drafts – the final drafts of each chapter went into this folder (i.e. those incorporating feedback from the editor, technical editor, and peer reviewer).  Remember to update the document link in the document discussed in tip #5 accordingly.  Tip – when you get to this stage, archive the corresponding chapter in the Drafts folder – it saves you accidentally opening the wrong version by mistake (especially useful when you forget to update the document link in the document discussed in tip #5).
  • Forms – this is where I put my contract and other files I needed to sign and send to the publisher.
  • Images – this is where I put all the images (usually screenshots) for the book.  Each chapter has its own folder under this folder for their images.
  • Peer Reviewed – “peer reviews” is a term I’ve coined for something that doesn’t really exist in the formal book writing process, but that I think should be (as I discuss in tip #12).  Documents with comments from the peer reviewer go here.
  • Planning – this is where I put the document discussed in tip #5, although it’s probably better if you place that document in the root folder instead.  You might also want to use this folder for keeping schedules (dates due, etc).
  • Production – when the book is finally complete, the chapters are sent back to the author nicely laid out, showing the results of all your hard work (as PDFs).  This is where I put them.
  • Tech Reviewed – as previously discussed, this and the Editor Reviewed folder should technically be the same folder.  This should be the folder where you put the documents after they’ve been reviewed by both the editor and the technical reviewer.

In addition, I added the Silverlight folder as a favourite in Windows Explorer so I could get to it quickly and easily from various Open/Save dialog boxes.  To add a favourite (I’m sure there’s an easier way, but this way works):

  1. Select the folder in Windows Explorer to add as a favourite.
  2. Now find the Favourites item near the top of the tree, right-click on it, and select the “Add current location to Favourites” menu item.

Tip #9 – Save early and save often

I’m a compulsive saver.  Pretty much every sentence I add, I follow with Ctrl+S.  Having lost work in years gone past from not saving regularly, it’s long since become a habit.  Word does have an auto-save feature, but I take no chances.

Saving to your hard drive is one thing, but if that dies (and we’ve all had that happen and lost work to it) or gets lost then you’re in trouble.  Therefore, regular offsite backups are essential.  For the VS2010 book we used Live Mesh, and for the Silverlight book I used Dropbox.  Both are quite similar in nature, but I switched to Dropbox for its versioning capabilities (which Live Mesh doesn’t have).  In hindsight, although both worked well, I’d probably have just been better using a Subversion repository, which would provide proper version control features (and share this with the “team”).  Assembla provides free and paid Subversion hosting (which I already use with clients, my team, and others, and have found really good).

Tip #10 – Capturing screenshots

Screenshots were the bane of my life when writing.  Especially with the VS2010 book, as I’d take a screenshot for beta 1, but then it’d change for beta 2 and I’d have to do them again.  Then the RC introduced additional changes, so I’d have to do them again.  Each screenshot often required a certain amount of configuration, so taking them wasn’t a quick process.  In addition, Windows Aero uses rounded corners, but when you take a screenshot of the window these corners are filled in black or a dark grey (and look horrible).  So you have to edit these out, which takes even more time (as demonstrated in the image below).

SnagIt (from TechSmith) is a great tool to help produce screenshots, but is a little on the expensive side.  Apparently, the newly released version 10 now (finally) handles this and fixes the corners (I’m still on version 7 though).  That would be a relief and save a lot of time.  If you don’t have SnagIt, you could use Jing (also from TechSmith), or one of the many other screenshot tools.  SnagIt is definitely the best however.  There’s another free screen capturing tool named 7capture which can remove the black corners, but I personally wasn’t terribly fussed with it.

I’ve noticed that Visual Studio 2010 and various other programs have some really weird windowing behaviour going on.  I’d often use one of these screen capture tools to capture a given window, but it would cut off half the title bar or other strange behaviour.  This makes taking a screenshot of a window even more painful, as you then have to take a shot of the whole screen and edit it manually to include just the window you are after.  Anybody else have this problem, or is it just my system?  An example of this behaviour is below, with the red box defining where SnagIt thinks the outer bounds of the window are:

Anybody have some tips in relation to taking screenshots?

Tip #11 – Dealing with a blank page

No matter how many times I started a new chapter, the blank page it presented me was always a scary experience.  My brainstorming document that I discussed in tip #5 helped, because I could dump all the points from that into the new chapter, and work from there.  The most important next step is to start building some sort of structure for the chapter, which acts as a framework where you can then fill in the blanks.  Each chapter is kind of like a jigsaw puzzle.  When you start a jigsaw puzzle, you typically dump all the pieces out on the table, start turning them the right way up, and find/connect all the edge pieces to provide a structure to work within.  Writing a chapter is much the same process.  Basically I start by performing a memory dump, putting everything relevant that I can think of randomly on the page (I tend to think of it as a “vomiting on the page” process, but that description hasn’t been popular with those I’ve shared it with thus far).  I then take all these ideas and points, and organise and rearrange them to form a structure for the chapter.  I can then expand on these to fill out the chapter.

I also try to ensure that I answer each of the following single-word questions in relation to each concept:

  • What?
  • Why?
  • Where?
  • How?
  • Who?
  • When?

What each of these “questions” refers to depends on the context, so I won’t expand upon them here.  However, I think if you attempt to answer each question in relation to a concept, it will more or less ensure that any questions the reader might have about that concept will be covered.

One thing I noticed in my chapters was that they were very text heavy, and this was noted by others who saw the chapters too.  When Greg Harris reviewed my chapters (see the next tip), he was very critical of this issue (rightly so).  He forced me to introduce more sub-headings, and extract blocks of text into bullet points.  Doing so helped a lot with the structure and readability of the book, and resulted in big improvements.

Tip #12 – Testing your book with a peer reviewer

Numerous people are involved in producing a book.  As an author, I write the book, but you also have input from the editor and the technical reviewer, and the copy editor fixes all your grammar problems, etc.  However, to me there’s an important piece of the puzzle missing in this process, and that’s having your book “tested” by the type of person who might buy your book.  The technical reviewer is someone already familiar with the technology being written about, and “tests” your book – looking for incorrect facts, malformed code, etc.  However, by knowing the technology well, they have pre-existing knowledge that influences how they perceive the book.  Therefore, it’s very easy for them to overlook readability issues, where you might introduce (but not explain) a term that they are familiar with, and thus keep on reading, whereas a reader might come to it and think WTF?

Therefore, I think it’s vital to “test” your book with a newbie (or still in the learning phase), representing the typical person that might buy your book.  I call these “peer reviews”, although there’s probably a better name for them.  I was very lucky in that in the VS2010 book I had fellow co-authors with whom I swapped my chapters (we mostly were writing about technologies we were already personally familiar with, and swapped with someone not quite so familiar with those technologies), and then for the Silverlight book Greg Harris kindly offered his services to review my chapters (and did a fantastic job).  Each peer review resulted in tonnes of fantastic feedback, and I believe the books are far better for it.

Tip #13 – Box selection

Not many people know about box selection of text.  Instead of normal line by line selection like this:

You can hold down the Alt key while selecting text, to select it like this:

This works in both Word and Visual Studio.  I’ve particularly found it handy when I’ve pasted indented code into Word, and want to remove the indenting back one level.  Rather than deleting the spaces line by line, you can use this trick to select the indented space in all the lines, and delete them with a single keystroke.

The End

OK, that’s it for now.  I expected this to be a short post, but it’s ended up almost being chapter sized (over 4500 words)!  I hope these tips help you, and I wish you luck in your writing.  If you have found these tips useful I’d love to hear about it.  If you’ve got your own tips, please leave them in the comments!  I might do another post sometime about the interesting things I’ve learnt along the way about the English language and structuring sentences.  But then again, I’ve pretty much had it with writing right now, so we’ll see :).
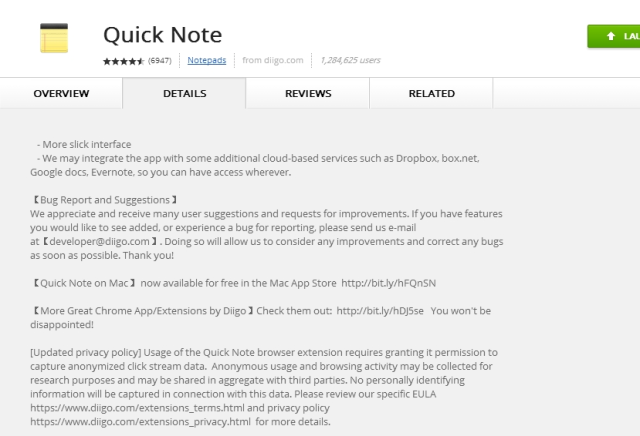
REMIX10 (Melbourne) Demo

It’s been a while since I last posted, as I’ve been flat out writing books (Professional Visual Studio 2010 as a co-author, and Pro Business Applications With Silverlight 4 on my own).  So I haven’t had much in the way of free time to post anything here.  However, I’m at REMIX10 in Melbourne at the moment, and am speaking on what’s new in Silverlight 4.  I’ve put together a demo of some of the new features which I’ll be presenting, and you can download the code for the demo here:

http://www.box.net/shared/yt5v7sqoue

You can also spin it up and give it a go here:

http://www.peerplacements.com/Demos/REMIX10/SL4NewFeaturesDemo.html

PDC09 News

Unfortunately I’m not at PDC09, but luckily the keynote today was being streamed (I will be on a bandwidth diet for the remainder of the month now) and came with some brilliant news for Silverlight business application developers.

After a laptop giveaway that was very Oprah (everyone gets free multitouch laptops!), the Gu came out (aka Scott Guthrie) for an epic keynote that even included an appearance by Scott Hanselman.  The announcement of Silverlight 4 was pretty much expected, but the breadth of new features it will contain pretty much takes away most reasons people will find to use WPF over Silverlight.  There was announcement after announcement after announcement – with major new features just receiving a single bullet point on the slides.  What has been included in the (expected) 5mb runtime is phenomenal.  I’m not going to go into all these features as Tim Heuer has done a fantasic job (as usual) of writing those up, but I will skim over what (in a business sense) I see as being important to business application developers.  Obviously the UserVoice site demonstrated its value, with people being able to vote on their most requested features.  Apparently 9 of the top 10 voted feature requests have been implemented in Silverlight 4 (although I’m not so sure of that regarding mobile incl. iPhone support).  Certainly the ones I voted for and really wanted are now included!

  • Printing + Print Preview – everyone wanted that.  Will stop the “Silverlight’s not ready for business because it can’t print” crowd (although I wrote up ways around that).
  • Commanding!  So important for MVVM.  MVVM will finally not need (as many?) nasty hacks.
  • MEF support!  I’m yet to discover this fully though as it was not covered in the keynote.
  • Rich text box – great news for displaying and editing documents.  I’m yet to find out if/how XPS documents get supported.
  • Drop target support – Scott Gu demonstrated dragging a Word document onto a Silverlight application which opened in the Rich text box!  Still need to see details of this example as to how it was achieved.
  • Web browser control – host any web page (including Flash even!) in your app.  So cool for integration and migration possiblities.
  • Clipboard support!  Demo included copying the contents of an entire datagrid into Excel – very cool.
  • IDataErrorInfo for validation.  Is this the end of nasty exceptions being raised for validation – I’m still to find out.
  • RIA Services – released version to work with the VS2010 beta 2.  I still need to investigate the other new features – I’m not sure what they are yet.  At least I can now write the RIA Services chapter of my VS2010 book!
  • WCF bindings – I believe I heard something about a wider range of bindings now available in WCF?  Hopefully wsHttpBinding.  I need to investigate.
  • Scroll wheel support in all of the controls out of the box (I don’t know why this wasn’t in V3 actually).
  • More data bindings (I believe – still to investigate if it’s on par with WPF now).
  • Implicit Styling – now themes can be developed without needing the (not so bad) hack that was the ImplicitStyleManager.
  • Out of sandbox, including accessing files on the client machine (user profile folders only) which is a big boon for a more streamlined user experience.  Also allows apps to be run with elevated trust.
  • COM object access, enabling integration with Office applications!  Not much good for cross platform support though.
  • Right-click / context menu support
  • Mention of keyboard support in full screen mode.  Security was a big concern for why this wasn’t permitted previously, now available to trusted applications (only).
  • Cross-domain calls (for trusted applications only).
  • Somebody mentioned custom chrome on Twitter – I think that was a mix up with Google Chrome (the browser) support, as Tim’s blog entry doesn’t mention it and I don’t recall hearing it in the keynote.

As you can see (and this isn’t all the new features – just the ones I’m most interested in!) there are a ton of new features for business application developers in Silverlight 4 – really almost everything we really wanted.  I think while there will still be a use for WPF, Silverlight 4 is going to seriously reduce the requirement to use WPF and the full .NET Framework – great for developers that have to/ want to support multiple platforms too.  Now we just need the long awaited mobile support – but not mention of that :(.  I’m very excited about this release and look forward to having a good play with it so I can report on it in an informed manner.  Note that you need VS2010 beta 2 to play with this.  Looks like Silverlight 4 development won’t be supported in VS2008.  But for Silverlight development VS2010 is much much much better!  You can get the beta here.

Disclaimer – this is a preliminary summary – I can’t guaranteee just yet until I’ve played with it all that all the above is correct.  Please forgive me if I misreported something…!

Interesting stat that Scott Gu mentioned – apparently 45% of internet connected devices now have Silverlight installed.  The reach of Silverlight is rapidly expanding – and I’m guessing will even more with the Winter Olympics site in Silverlight (I believe – unfortunately the streaming viewers were not allowed to view that demo) :(.